

Fred's Appliance
October 7, 2019
Oven Repair
Oven door hinges are an important and under-considered part of the oven assembly. They seem small and stubby to look at but are actually tall and powered with tension springs inside the oven door itself. If your oven is not closing properly because the hinges are bent or otherwise damaged, it is surprisingly easy to replace your oven door hinges with a little time and screwdriver work.
Today, we’re here to take you step by step through replacing your oven door hinges.
1) Assemble Your Supplies
Begin by collecting the supplies you need. This repair is fairly simple so you will only need a small list of things. But you will need plenty of space to layout the oven door while you are working on it.
You will also need exactly the right new hinges to install. Make sure you are confident about the make and model of your oven, and that you have the right part number according to the manual.
- Screwdrivers (Phillips and Flat)
- Work Gloves
- Towels and Surface Space
2) Safety First
- Cool Oven
You will need to make sure your area is ready and the oven is safe to work with. This is not an electrical repair, so you do not need to unplug the oven But you do need to make sure that the oven is cool enough to comfortably grasp the door with both hands. Wait at least an hour after turning off your oven to perform this repair.
- Put On the Gloves
Next, put on the work gloves. This will protect your hands from the sharp metal edges you will be working with during the middle section of this repair.
3) Remove the Oven Door
- Fully Open the Oven
Open the oven door to its full extent, so that the door is parallel with the ground.
- Release the Hinge Locking Tabs
Most ovens have hinge locking tabs, but some do not. You may find the locking tabs at the base of the hinges or up along the side of the oven door pocket. When you find the tabs, if there are any, use your flat screwdriver to pry them open. Press them as far open as the tabs will go to clear the track.
- Lift the Door to the Broil Position
Push the oven door up into the broil position. This is where the oven stands ajar on its own.
- Pull the Oven Door Up and Away
Grasp the oven on both sides with your gloved hands and lift. If this is too heavy, ask a friend to help you lift the door evenly and safely.
- Place the Oven Door on a Work Surface
Door in hand, carefully place the door handle-down on a towel-covered work surface.
4) Disassemble the Oven Door
- Remove the Oven Handle
The first disassembly step is to remove the oven handle. This is because it’s mounting screws go all the way through the different layers of the oven door.
- Remove the Inner Panel Mounting Screws
Along the bottom of the oven door are screws that hold the inner panel in place. Remove them and carefully set the screws aside so they don’t get lost.
- Set Aside from the Inner Panel
Pull away the inner panel and set it gently on another towel near your work surface. This is also a great opportunity to clean between your oven window glass, something that drives many of us crazy when it can’t be reached with a soapy sponge normally.
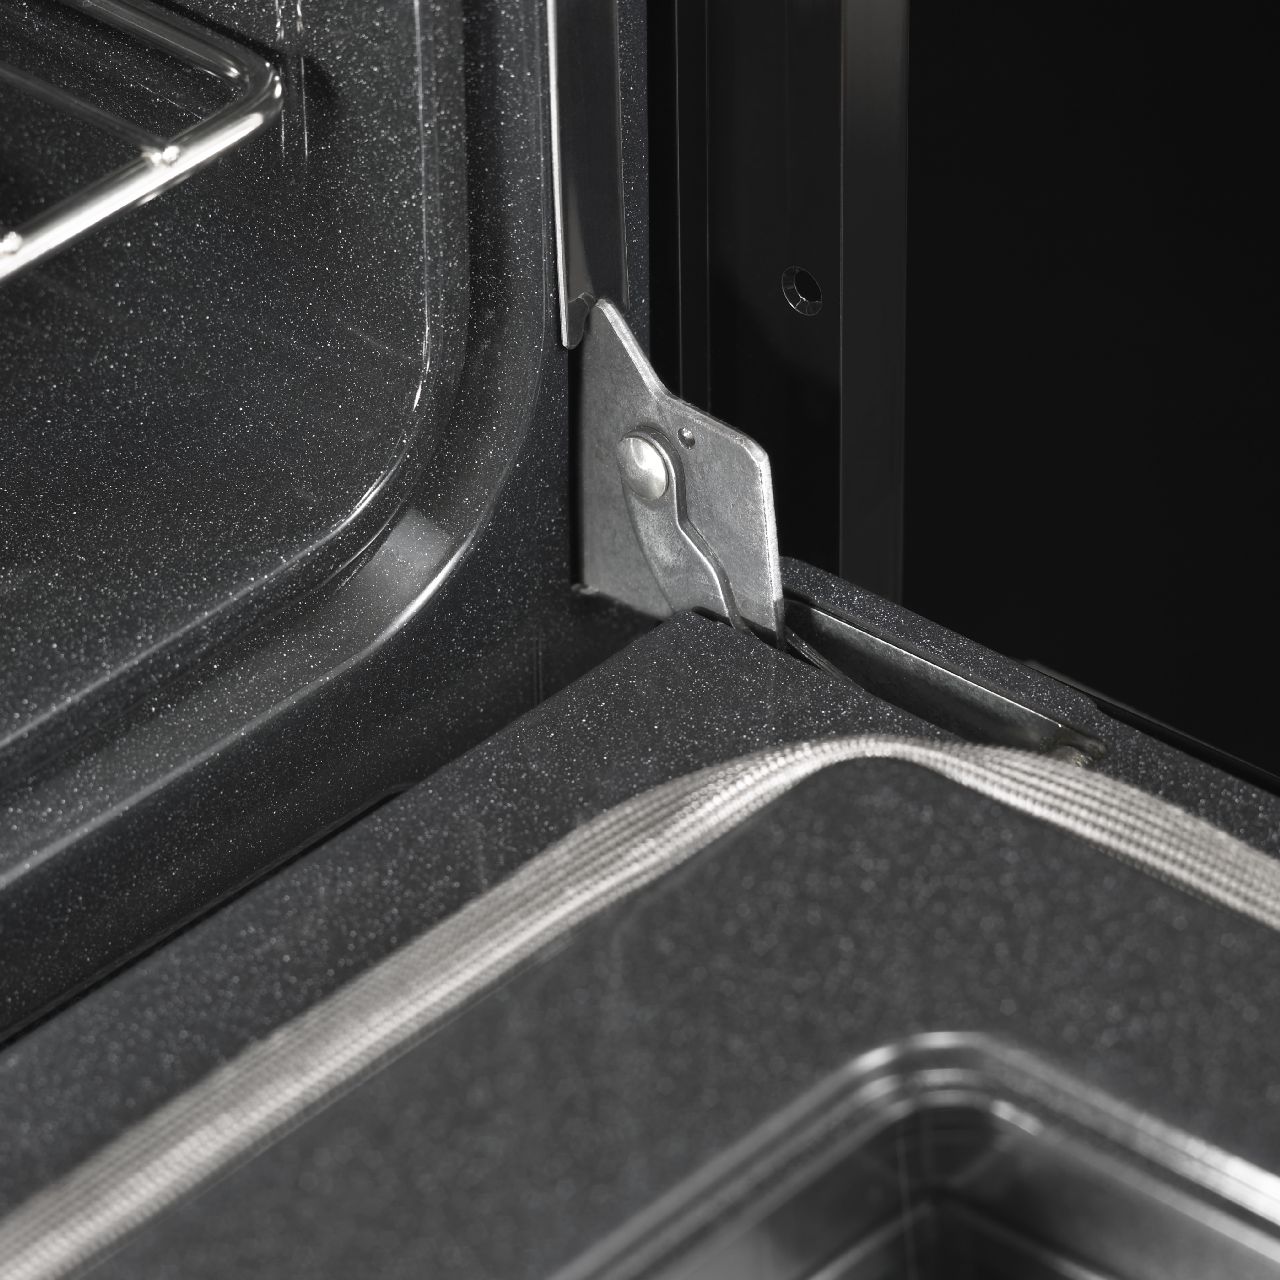
5) Remove the Old Hinges
- Remove the Hinges Mounting Screws
Beneath the inner panel, you will find the oven door assembly. Along the lower side of the door assembly are the hinges, which extend several inches above the hinge piece you’re used to seeing. Remove the mounting screws that hold the hinge columns in place and set them aside neatly as well. You will need them later.
- Pull the Hinges Up, then Away
Carefully pull the hinges up and then pull them away from the door assembly. This will help to keep the hinge pieces from catching on their way out. These old hinges can be discarded or examined as you see fit.
6) Install the New Hinges
- Align the New Hinges
Grab your new hinges and make sure they are fully unpackaged. Then align them with the slots recently vacated by the old hinges.
- Set the Hinges Into Place
Carefully set, and then pull the hinges into place so that the tines at the bottom settle into their slots and the box settles neatly into the cavity provided for it.
- Return the Hinge Mounting Screws
Twist the hinge mounting screws tightly back into place. With your new hinges installed, it’s time to reassemble the oven door.
7) Reassemble the Oven Door
- Set the Inner Panel Into Place
Carefully lift and then settle the inner panel into place over the outer panel. Check to be sure all the pieces are properly aligned and the edges overlap in the correct manner.
- Return the Inner Panel Mounting Screws
Place the inner panel mounting screws back into their holes along the bottom of the oven door. Do not tighten them all the way just yet. You will need a little ‘wiggle room’ to get the alignment right.
- Reinstall the Door Handle
Grab the door handle and it’s two screws and reinstall them together. Do not fully tighten these screws either, but be sure the handle will not fall when you let go.
- Tighten the Screws
Now tighten all of the screws for the door handle and inner panel, which will ensure each of them is properly aligned and secure.
8) Reinstall the Oven Door
- Lift Oven Door Onto the Hinge Mounting Point
Alone or with the help of a friend, lift the oven door and place it back into the Broil position where it was mounted before. The hinges should set into place. If you have trouble, as a friend to align the hinges from the bottom while you lift and lower from the top.
- Open the Door Fully
Fully open your oven door so that the hinge latches are exposed.
- Return the Locking Tabs Into Place
Using your flat screwdriver, flip the hinge latches or locking tabs back into place and make sure they are secure.
- Close the Oven
Fully close your oven and see if it looks aligned.
9) Test Your New Hinges
Now that your hinges are reinstalled, it’s time to run a few tests. Open and close your oven a few times to see how it feels and if it swings evenly. Check to see if the oven closes fully, and consider toasting something to assess how much heat escapes around the oven door. If your results are satisfactory, congratulations. Contact us today for more helpful repair tips and guides.
888-453-7337Text or ring! ring!
Live ChatClick to say hi

Apr. 09, 2024
How to Fix the nF Error Code on a Samsung Washer

Apr. 09, 2024
Kenmore Elite Dryer Issues: How To Troubleshoot

Mar. 06, 2024
Microwave vs. Oven: Pros and Cons and How They Differ

Mar. 06, 2024
Self-Cleaning Oven Smell: Causes & Odor Reduction Tips

Mar. 06, 2024
Frigidaire Ice Maker Not Working? 7 Ways to Fix It

Feb. 05, 2024
Why Is Your LG Refrigerator Not Cooling? (9 Common Reasons)

Feb. 05, 2024
GE Oven F2 Error: Causes & Solutions

Jan. 03, 2024
How to Reset the Water Filter Light on a Samsung Refrigerator

Jan. 03, 2024
Maytag Washer Showing F5 Error Code? Here’s What To Do

Jan. 03, 2024


