

Fred's Appliance
August 6, 2019
Refrigerator Repair
The modern refrigerator os a marvel of advanced and traditional technology. The ability to keep food cold is one of the best things we have ever done for ourselves and future generations. The fridge introduced long-lasting eggs, bread, and meat to the family diet because it does not rust or grow mold there. Great can sometimes last for months in the fridge. So it can be pretty devastating when your fridge stops working.
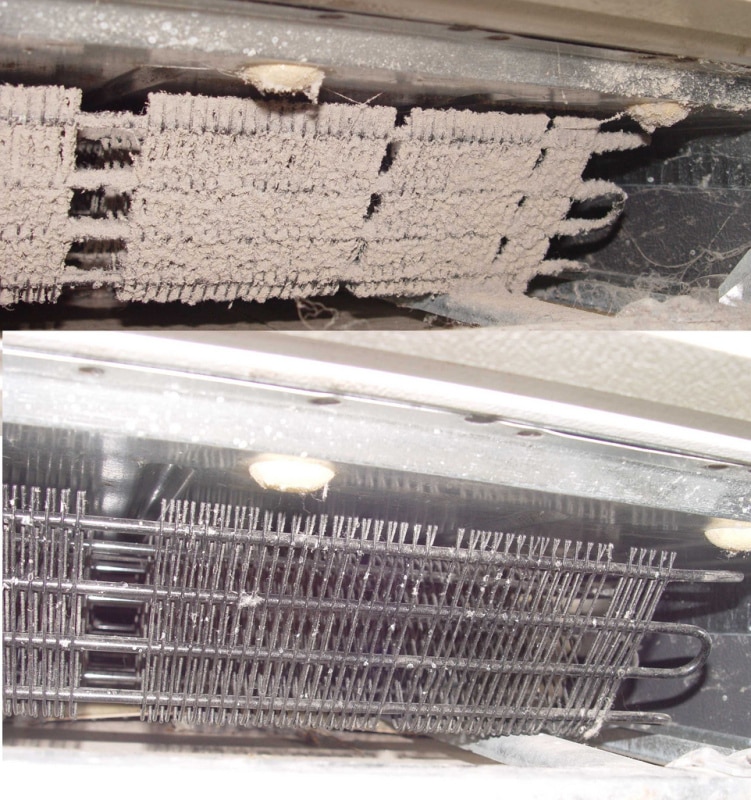
Especially if it creeps up on you like a not-quite-cool-enough refrigerator with dirty condenser coils. Condenser coils are part of the critical systems that keep your fridge producing cold. The problems are that when a layer of dust and household grime builds up on your condenser coils, the system will overheats. If the system is generating too much heat or approaching mechanical failure, then it will not be nearly as efficient at cooling the fridge and it might even stop completely.
Fortunately, cleaning your condenser coils is not hard. Not if you know what you’re doing and have the right supplies to do it with. Join us today for a quick guide on how to clean your fridge condenser coils and safely get your fridge back into tip-top condition.
Be Prepared to Repair
- Know Your Condenser
The first step for cleaning your condenser is knowing where it is. Every brand and model of refrigerator is a little different, but most fridges keep their compressor underneath the appliance behind some kind of cover or grate. Find what these elements look like for your fridge and confirm it by looking up a parts guide or manual for your refrigerator. If you don’t have the booklet from buying the fridge (most people don’t) then you can usually find the details online.
- Collect the Supplies
This is a fairly simple repair and therefore won’t require many supplies. Most importantly, you need something to clean the coils with. Possibly several somethings if the coils are very dirty to start with. Here is our suggested collection of starting equipment:
- Work Gloves
- Screwdriver
- Soft Bristle Brush
- Vacuum with Edging Attachment
- Shop Towels
- Heavy Duty Sponge
- Dish Soap
Getting Started
- Unplug the Fridge Power Cable
Once you’re ready to begin, unplug the fridge. This is for your own safety and your food will be perfectly fine for half an hour if the fridge door stays closed. Disconnecting the fridge from power will ensure that your hands are safe from shocks and electrocution while rummaging around in the bottom or back of your fridge appliance.
- Remove the Cover Over Your Condenser
Find the cover or grate that protect the condenser coils from everyday exposure. In most cases, this cover will be along the bottom of the fridge. Check to see if it is a screw-in or clip method to determine the tools and approach you will need to pop that cover open and reveal the dirty condenser coils inside.
- Clean the Cover or Set Aside to Clean
Once you’ve popped free the cover and have it in-hand, you’re sure to notice how dirty this particular vent has become over the years. Grease, spills, and floor grime all play a part in how dirty a refrigerator vent cover can be. So pop that thing in the sink and give it the scrubbing if your life. Or, if you’re in a hurry, just use a few moistened paper towels to wipe away the worst of it.
At least moderately cleaning the great is important to keeping those condenser coils clean in the future and promoting healthy airflow through the fridge components.
- Straighten Any Bent Fins
If your condenser coil fans to have been knocked significantly out of place, consider reaching out and personally straightening any bent fan blade. This can improve the performance of your condenser and your fridge noticeably. However, only bend a piece of your fridge’s inner workings if you are very sure what you are doing (and that the fridge is unplugged) before you do it.
Cleaning the Fridge Condenser Coils
- Gently Brush Away Lint from Condenser Coils
With the soft-bristled cleaning brush you found, very gently sweep off the condenser coils to clear away the dirt, dust, and hair that has built upon them. The brush should be able to handle most things. But for what’s left, there’s the vacuum,
- Vacuum With Soft Brush Attachment
Vacuum in hand, start with a soft brush attachment and gently sweep over the coils again. This time with the help of suction. Carefully move the vacuum head back and forth over the coils, paying special attention to crevices and spaces for extra dust to build up.
Then switch to the precision corner attachment. Use this to hunt up any remaining specs of dust or grime that might be acting as an insulating blanket for the coils which need to be kept cool.
When your vacuuming is done, you should be confident that the coils are completely clean. This can signify the exciting moment that sodas will get properly cold and your food can go back to last for weeks in the fridge.
- Reattach the Grate or Cover
With the coils clean, you are free to replace the grate and check your fridge to see if it worked. Be sure to attach the grate the exact same way you removed it with screws or clips.
Testing Your Handiwork
- Plug the Fridge In
Now that everything’s together, it’s time to test your handiwork. The first step, naturally, is to turn your fridge on and let it start cooling. And the true test of a working condenser coil is that the fridge stays icy cold over several hours throughout the day. So check back in from time to time.
- Place a Small Shelf Thermometer to Find Out
The best way to catch problems with your fridge coolness level is to not be caught off-guard. You can actually keep a really close eye on your fridge temperature and optimize with a simple clip-in fridge thermometer. Now you’ll always know how cold it is inside your fridge at a glance.—For more smart home appliance repair tips or help taking care of the appliances in your home, contact us today!
888-453-7337Text or ring! ring!
Live ChatClick to say hi

Apr. 09, 2024
How to Fix the nF Error Code on a Samsung Washer

Apr. 09, 2024
Kenmore Elite Dryer Issues: How To Troubleshoot

Mar. 06, 2024
Microwave vs. Oven: Pros and Cons and How They Differ

Mar. 06, 2024
Self-Cleaning Oven Smell: Causes & Odor Reduction Tips

Mar. 06, 2024
Frigidaire Ice Maker Not Working? 7 Ways to Fix It

Feb. 05, 2024
Why Is Your LG Refrigerator Not Cooling? (9 Common Reasons)

Feb. 05, 2024
GE Oven F2 Error: Causes & Solutions

Jan. 03, 2024
How to Reset the Water Filter Light on a Samsung Refrigerator

Jan. 03, 2024
Maytag Washer Showing F5 Error Code? Here’s What To Do

Jan. 03, 2024


